Upgrading to a new phone or laptop is exciting – but what about the sensitive data still stored on your old device? If you’re not careful, those discarded gadgets can become a goldmine for identity thieves. In fact, one 2023 experiment found personal files on 35% of used hard drives bought online (over 5.7 million recovered files in total).
Only 1% of the drives had been properly encrypted prior to sale – the rest left data exposed. And it’s not just hard drives; many people forget to wipe their phones and tablets too. A recent survey revealed 26% of Americans don’t remove their data before recycling an old device, with over half regretting it later. From photos and passwords to financial records, any leftover information could be retrieved by the next person who gets that device.
To protect your privacy and security, you need to permanently erase data from old devices before you sell, donate, or recycle them. Simply deleting files or doing a basic factory reset isn’t enough, as remnants of your data can often be recovered with readily available software. The good news is that in 2025, most phones and computers offer tools for thorough data wiping – if you know how to use them.
This guide will walk you through proven methods to securely wipe personal data off any device (computers, smartphones, tablets, external drives, etc.), ensuring that your information stays out of strangers’ hands. Follow these tips to safely clean out your old tech so you can upgrade with peace of mind.
Key Takeaways:
- Always back up your data before wiping a device, so you don’t lose anything important.
- Simply deleting files or doing a basic factory reset won’t truly erase data – the information can often still be recovered without proper wiping.
- Use secure methods to wipe each type of device: for computers, run a full disk wipe or use the OS’s “factory reset” with drive cleaning; for phones/tablets, encrypt the device (if not already) and then perform a factory reset (this combination ensures data is unrecoverable).
- Don’t forget to remove SIM cards and memory cards from phones, and sign out of accounts (Apple ID, Google, etc.) before resetting to avoid leaving any personal links. Wipe or destroy those extra media (SD cards, external drives) as well.
- For extremely sensitive data, consider physical destruction of the storage (e.g. shredding or drilling a hard drive) as the only guaranteed way to make data irretrievable. (Use this as a last resort if software wiping isn’t sufficient.)
Why You Should Permanently Erase Data from Old Devices
Deleting is not the same as destroying. When you “delete” a file or do a standard factory reset, the data isn’t actually gone – the system typically just marks those sectors of storage as available. The actual bits of your photos, emails, and documents remain on the drive until they get overwritten. This means a bad actor could use basic recovery software to resurrect your supposedly erased files. In other words, a normal delete or quick reset only hides your data, but doesn’t truly wipe it.
The risks of leaving data behind are serious. If you dispose of a device without securely erasing it, someone with a little tech knowledge could retrieve sensitive personal information: think saved passwords, financial records, tax returns, private photos, or company documents. This can lead to identity theft, financial fraud, or embarrassment if that data falls into the wrong hands.
Real-world studies keep proving this danger – from researchers recovering millions of “deleted” files off second-hand hard drives to surveys finding that many people’s old devices still contain passwords or even social security numbers. Proper data erasure ensures your information is completely removed, making it unrecoverable to any snoop or hacker.
There’s also a legal and compliance angle. For businesses and professionals, failing to wipe data properly isn’t just risky – it may violate data protection laws. Many industries have strict regulations (and hefty penalties) around how customer data or confidential records are disposed of. Even as an individual, you have a responsibility to ensure that any device containing others’ personal data (say, a work laptop or a phone with clients’ contacts) is sanitized before disposal. In short, thoroughly erasing data protects you and keeps you in compliance with privacy laws.
Lastly, wiping devices enables safe reuse or recycling. If you can’t erase a device, you might feel your only option is to hoard it or physically destroy it. But by learning how to securely wipe data, you can confidently donate or sell old devices knowing they won’t leak your information. This not only gives the device a second life but also helps avoid unnecessary e-waste. (Of course, if a device cannot be wiped due to damage, then physical destruction is the safest route – we’ll cover that below.) The bottom line: permanently erasing data from your old devices is crucial to protect your privacy, prevent data breaches, and let you recycle tech responsibly.
Preparing Your Device for a Secure Wipe
Before diving into the data destruction process, take a few preparatory steps to ensure things go smoothly:
- Back Up Important Files: Once erased, data is gone forever, so save anything you want to keep. Transfer photos, documents, contacts, etc. to a new device or a cloud/external backup. Double-check that your backups are accessible and complete. (It’s better to have two backup copies than zero!)
- Sign Out of Accounts & Disable “Find My”: Remove or sign out of any accounts linked to the device. For phones, log out of your Apple ID or Google account and turn off phone-finding services (e.g. Find My iPhone on iOS, Find My Device on Android). On computers, sign out of services like iCloud, Google, or Microsoft accounts if applicable. This prevents any cloud links or activation locks from lingering once the device is wiped.
- Remove SIM Cards & External Storage: For smartphones, eject the SIM card and any microSD memory card before wiping. SIMs can contain contacts or messages, and SD cards definitely hold data – they need to be erased or destroyed separately. For computers, be sure to remove any USB flash drives, CDs/DVDs, or external hard disks attached. (We’ll address wiping external media in a later section.)
- Charge the Battery or Plug In: A full data wipe can take some time, and you do not want the device dying mid-process. Plug laptops into power. Charge phones to 100% (or leave them connected to a charger) during the reset. This ensures the wipe completes without interruption.
- Gather Any Tools or Software: If you plan to use a special wiping program (for example, a bootable USB tool to nuke a hard drive), get that ready in advance. Download the software and create the bootable USB or CD before you erase anything. Likewise, find any manufacturer-specific tools you might need (for instance, some SSD makers provide a utility to securely erase their drives).
Taking these steps up front will help avoid headaches (like realizing after the fact that you needed a file, or getting locked out of a phone you sold). Once you’ve backed up data, logged out, removed cards, and charged up, you’re ready for the actual wiping process.
How to Permanently Erase Data from Computers (Laptops & PCs)
Whether it’s an old desktop PC or a laptop, simply deleting your user files isn’t enough to foil data recovery. Here’s how to securely wipe a computer’s storage drive so that your personal data is unrecoverable. The exact method can vary slightly based on your operating system and whether you have a traditional hard disk drive (HDD) or a solid-state drive (SSD):
Use the Operating System’s Secure Reset Feature: The easiest option for modern computers is to use the built-in factory reset or disk wipe utility. On Windows 10 or 11, go to Settings > System > Recovery > Reset this PC and choose “Remove everything.” When prompted, select the option to “clean the drive” instead of a quick removal. This tells Windows to overwrite all sectors of the disk (it may write zeros or random data over the whole drive) rather than just deleting files.
A full clean reset can take a while, but it ensures that previous data can’t be recovered. On macOS, you have a similar capability: first sign out of iCloud and deauthorize any services (as mentioned above), then reboot into macOS Recovery (by holding Command + R on Intel Macs or using the Recovery Assistant on Apple Silicon Macs). Use the Disk Utility to erase the Mac’s drive completely.
If it’s an older Mac with an HDD, you can click Security Options and choose a 2-pass or 3-pass erase for extra assurance. Newer Macs with SSDs or the T2/Apple Silicon chip encrypt data by default, so a standard erase (or using the “Erase All Content and Settings” feature in macOS Monterey and later) will instantly make data inaccessible by discarding the encryption keys. In short, leverage the OS tools to restore the computer to a factory-fresh state while securely overwriting the disk – this is simpler than manual methods and usually very effective.
Alternatively, Boot a Dedicated Wiping Tool (for older systems or extra assurance): If the computer isn’t functional or you prefer not to trust the built-in reset, you can use specialized data wiping software to overwrite the drive. Programs like DBAN (Darik’s Boot and Nuke) or Eraser can be loaded from a USB or DVD and will systematically overwrite every bit of the drive with gibberish.
This is a good method for PCs that you’re recycling or for wiping secondary drives. To do this, download the wiping tool of choice (DBAN is free and popular for HDDs), create a bootable USB, and follow the prompts to wipe the drive. These tools often let you specify multiple passes (e.g. write over the data 3 times) for additional security, though a single pass is typically enough in practice.
Note: If you’re wiping an SSD, avoid tools not designed for SSDs – they can shorten the drive’s lifespan without guaranteeing an overwrite of all memory cells (due to wear-leveling). Instead, look for an SSD-specific secure erase utility. Many SSD manufacturers provide proprietary “Secure Erase” tools on their websites, or you can use a utility like Parted Magic or command-line tools (hdparm for SATA SSDs, or manufacturers’ toolbox software) to trigger the SSD’s built-in secure erase command.
This resets all flash cells to empty state at the hardware level. The key takeaway: use the right tool for your drive type. Traditional wiping software works well for spinning hard drives. For SSDs, use manufacturer-recommended secure erase methods or encryption (see next step) to ensure data is truly gone.
Consider Encryption as an Extra Layer: If you weren’t using disk encryption before, you have the option to encrypt the drive before wiping it – especially useful for SSDs. By enabling full-disk encryption (such as BitLocker on Windows or FileVault on Mac) and then immediately wiping the encryption keys (via factory reset or by formatting the drive), the data becomes unreadable even if some fragments remain.
For example, you could encrypt an SSD and then do a normal format; without the key, all data looks like random noise. This technique is often faster than overwriting every block on an SSD. Many newer computers already have encryption turned on (Windows devices with “Device Encryption” or BitLocker, Macs with FileVault). If yours wasn’t encrypted, you can turn it on, let it encrypt the disk, and then proceed to erase the disk. This way, even if a sliver of data survived, it’s encrypted gibberish. Encryption + wipe = a very secure erase.
Verify the Wipe (Optional): It’s wise to confirm that your drive is indeed clean. After running the reset or wipe, you can reboot the computer and see if it boots to a fresh setup or shows no trace of your old files. For extra peace of mind, try using a file recovery tool (like Recuva or TestDisk) to scan the drive. Ideally, the scanner should find zero recoverable files or just random gibberish. If it doesn’t find anything meaningful, your erasure was successful. (If it does find remnants, you may need to repeat the wipe with a more thorough method.) Business users disposing of drives might also use professional verification – some tools generate reports, or you can hire a service to certify that the drive meets data sanitization standards.
Physical Destruction as a Last Resort: If software-based wiping isn’t possible or you have extremely sensitive data, you might opt to physically destroy the drive after wiping. This is typically not necessary for most home users, but it’s common in high-security corporate settings. Physical destruction means rendering the storage device unusable – shredding a hard drive with industrial equipment, drilling holes through the drive’s platters, or smashing the drive to bent metal and shattered chips.
A thoroughly destroyed drive’s data cannot be recovered by any means. Even a simple method like hammering a steel nail through the hard disk (to shatter the internal platters) works well. If you choose this route, exercise caution (wear safety goggles and remove any batteries or power sources first). We’ll discuss device destruction in more detail later, but know that for a computer hard drive, a combination of secure wipe and physical destruction is the ultimate guarantee.
Many experts recommend wiping and then physically destroying drives that held highly confidential info – the wipe ensures nothing can be easily read, and the destruction protects against any theoretical advanced recovery attempts. Again, for normal data, a proper digital wipe is sufficient; use destruction only if you deem it necessary.
By following the above steps, you can confidently erase a computer or laptop before handing it off. The key is to overwrite or encrypt the data so it’s inaccessible. Once done, your old PC is safe to recycle or sell – just as clean as when it came from the factory, with none of your personal files left on it.
How to Erase Data from Smartphones & Tablets
Mobile devices pose a special challenge: they often hold some of our most sensitive information (messages, photos, app data) and many people simply do a quick reset, not realizing that data can linger. Fortunately, modern smartphones have strong encryption features, which makes secure wiping easier than it used to be. Follow these steps to permanently erase data from your Android phone, iPhone, or tablet:
- Back Up Your Mobile Data, Then Remove SIM/SD Cards: Before wiping your phone or tablet, back up any data you want to keep – for example, sync your photos to cloud storage or save contacts and notes via your Google or iCloud account. Confirm that your important stuff is safely backed up. Next, power down the device and remove the SIM card (SIMs can store contacts and some SMS) and any microSD memory card if your device has one. Set those aside – you can reuse them or destroy them later. If you plan to give the device to someone else, do not include your SIM or memory card! (You should either keep the SD card or securely erase it using the methods in the next section.) This step ensures those little chips don’t accidentally carry over your info.
- Sign Out of Accounts & Disable Security Locks: This is a crucial step before resetting a phone, to avoid any lockouts and to ensure no personal accounts remain on the device. On an iPhone or iPad, go to Settings and sign out of your Apple ID (this will turn off Activation Lock and Find My iPhone for the device). Also, turn off Find My tracking in Settings > [Your Name] > Find My > Find My iPhone (so that Apple’s servers mark the device as no longer linked to you). On Android devices, remove your Google account under Settings > Accounts. Some Android phones also have a feature called Factory Reset Protection (FRP) – removing your Google account will disable FRP so that the next person can activate the phone. Additionally, sign out of any important apps (email, social media, etc.) if possible. The idea is to deregister all accounts on the device. This not only protects your data, but also prevents the annoying scenario where the new owner can’t set up the phone because it’s still tied to your cloud account.
- (For Android) Enable Encryption if Not Already On: Most modern phones are encrypted by default, but if you have an older Android device (pre-2016 or so) that isn’t encrypted, you’ll want to encrypt it before resetting. This adds an extra layer of protection. To do so, go to Settings > Security > Encrypt phone (the menu might vary by manufacturer). Plug the phone into power and follow the prompts to encrypt the storage. (On some phones it may say encryption is already enabled – which is good.) iPhones and iPads have had built-in hardware encryption for years (as long as you use a passcode, all data is automatically encrypted), so you typically don’t need to do anything extra on an iOS device. The goal here is that when you perform the factory reset in the next step, any bits of residual data will be scrambled and unreadable because they were encrypted. Consumer Reports and security experts recommend this encrypt-then-reset approach as the best way to securely wipe mobile devices.
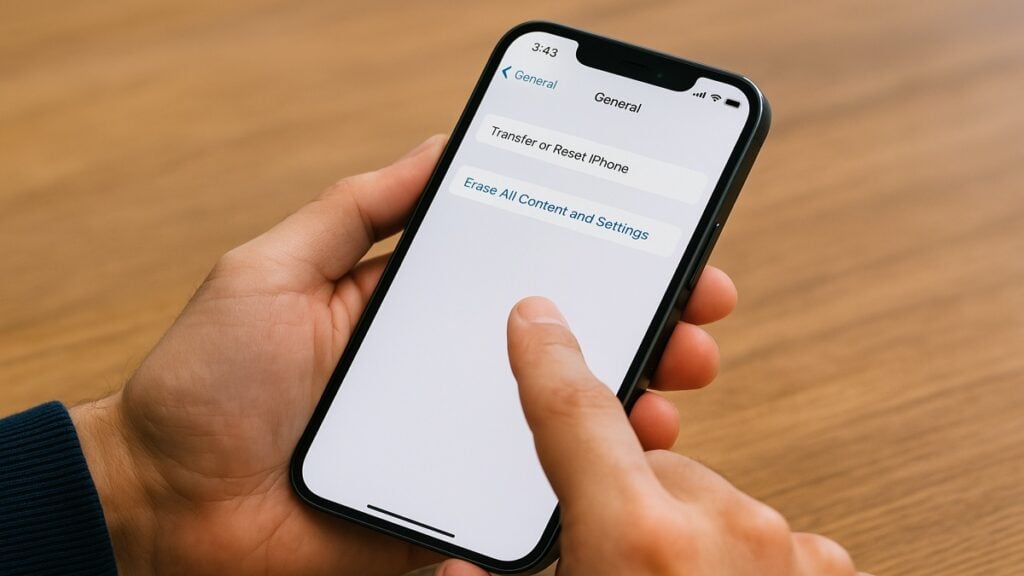
- Factory Reset the Device: Now perform a full factory reset to erase all user data and restore the device to its factory settings. On an iPhone/iPad, go to Settings > General > Transfer or Reset [Device] > Erase All Content and Settings. Confirm and let it wipe (the device will reboot and eventually show the welcome setup screen). On Android, go to Settings > System > Reset Options > Erase All Data (Factory Reset). You may need to enter your device PIN/password to confirm. The phone will restart and begin wiping itself. This process can take several minutes. What the factory reset does is delete all your apps, accounts, and personal files from the device’s internal storage. Importantly, because you enabled encryption, the reset also deletes the encryption keys, making any leftover bits of data effectively impossible to decipher. Modern iPhones, for example, are designed such that a factory reset instantaneously renders data unreadable by discarding the keys in Secure Enclave. On Android, the reset will typically overwrite directory structures and also remove encryption keys tied to your data. In summary, a factory reset (especially on an encrypted device) should permanently erase your personal data. Pro Tip: If your device has an option to erase SD card during the reset (some Androids do, for internal SD storage), be sure to select that as well.
- Confirm the Phone is Wiped Clean: After the reset, the device should reboot to a welcome or setup screen (just like a brand-new phone). This is a good sign. To double-check, you can walk through the initial setup without logging into any accounts, and then inspect the storage – none of your old accounts or files should be present. There are also mobile forensic tools (and some Android apps) that can attempt data recovery, but if you followed the steps above, they shouldn’t find anything. Essentially, make sure the phone behaves like a fresh device: no personal wallpaper, no contacts, no messages, nothing in the photo gallery. If something somehow is still there, you may not have done the reset correctly – go back and try again. In 99% of cases, though, a proper factory reset on a modern phone with encryption will remove your data beyond any practical recovery. If you want absolute certainty and the data was highly sensitive, you could physically destroy the phone after resetting (more on physical destruction below) – but for most, this is not necessary. As an extra step, you could also erase the removed SD card by connecting it to a PC and formatting it (or physically shredding it if it contained sensitive info and you don’t need it anymore).
Your smartphone or tablet should now be free of personal data and safe to hand over. One study noted that a factory reset is one of the most reliable methods for smartphones because of strong encryption, effectively making the old data inaccessible. Just remember to also hand over or properly dispose of any accessories like SIMs or cards separately. And for your own records, it’s good to remove the device from any device-tracking accounts (e.g. remove it from your Apple ID devices list, or the list of devices in your Google account) after the wipe, so it’s fully disassociated from you.
Wiping External Drives and Memory Cards
Old USB flash drives, external hard disks, and memory cards (SD cards from cameras, etc.) can contain a lot of data yet are often forgotten. Don’t overlook these devices – you should permanently erase data from them too, or destroy them if they are no longer needed. Here’s how to handle external storage securely:
USB Flash Drives & SD Cards (Flash Media): The simplest way to wipe a USB thumb drive or SD card is to format it with an overwrite. Plug it into your computer. On Windows, you can use the Format command and check “Enable Quick Format” off (i.e. do a full format) – in Windows 10/11, a full format will actually write zeros to the entire drive. For an even more thorough job, use the Command Prompt: format X: /P:1 will fill the drive labeled X: with zeros in one pass (use /P:3 for 3 passes, etc.).
On a Mac, open Disk Utility, select the external drive, choose Erase, and then click Security Options to do a pass of random data (older Mac OS versions even allow 7-pass overwrites). Because USB drives and SD cards use flash memory (like SSDs), one pass of zeros or random data is usually sufficient – you don’t want to overdo it and wear out the device. After formatting with a full overwrite, none of your old files should be recoverable. As always, if it was sensitive, you can try a recovery tool on it to confirm it’s blank.
External Hard Drives (HDDs): External HDDs can be wiped the same way as internal drives. If you have an old external USB hard drive full of data, connect it and either run a wiping software on it (like CCleaner’s Drive Wiper or a free tool like Eraser) or perform a full format as described above. For instance, using Windows Disk Management or DiskPart’s clean all command will write zeros to the entire external drive. These spinning drives don’t have the wear-leveling issue, so feel free to do multiple passes if it makes you comfortable (a 3-pass overwrite is a common standard). Just be aware it can take many hours for a large drive.
Encrypted Drives: If your external drive was hardware-encrypted or you used software encryption (e.g. VeraCrypt, BitLocker To Go), a quick way to “wipe” it is to change or delete the encryption key. For example, a hardware-encrypted drive might have a feature to perform a crypto-erase (which instantly invalidates the data). Otherwise, you can just format it normally (since the data was encrypted, it’s already garbled to anyone without the key).
Physical Destruction for Removable Media: If you have floppy disks, optical media (CDs/DVDs), or flash drives that you absolutely cannot wipe or don’t trust to resell, you can physically destroy them. Cut up CDs with scissors or use a disc shredder. For USB drives or SD cards, you can crush or melt the memory chip – ensure the actual chip is destroyed, not just the plastic casing. Small media can also be shredded by services. As with larger devices, physical destruction is the surest method of preventing any data retrieval, and it might be appropriate for very sensitive archives (or if an external drive dies and you can’t wipe the data, for instance).
In summary, treat your external storage with the same care as your computer’s internal drive. They can contain backups, photos, or files you moved off your PC – which could be just as sensitive. Wipe them using PC tools or destroy them, and you won’t have to worry about someone finding an old USB stick of yours and digging up its contents.
When to Consider Physical Destruction of a Device
Physical destruction is the ultimate form of data erasure. It’s often not needed if you can securely wipe the data, but in some cases – especially with highly confidential information or faulty storage devices – you may choose to destroy the hardware to be 100% certain no one can ever retrieve the data. In fact, some privacy regulations and company policies require physical destruction for certain types of data storage as part of the disposal process. Here’s what to know about physically destroying old devices:
Why destroy? The main reason is that it guarantees data is unrecoverable. Even advanced forensic labs can’t piece together data from a device that’s been shredded into tiny fragments or incinerated to ash. If a device is broken and you can’t run a wipe program on it, destruction might be your only option to secure the data it contains. Some users also do a digital wipe first, then destroy the device as belt-and-suspenders security (e.g. wipe a hard drive, then drill it). This is common in government and enterprise settings for top-secret data.
What methods work? You have a few choices:
- Shredding: Industrial e-waste shredders can chew up hard drives, phones, etc. into little pieces of metal and plastic. This is very effective (the storage platters/chips are physically pulverized). Many electronics recyclers or data destruction services offer shredding and will even give you a certificate of destruction.
- Drilling/Hammering: For hard disk drives, drilling holes through the drive can shatter the internal platters. Aim to puncture multiple spots through the platter disc. Similarly, whacking a drive with a heavy hammer until the platters are cracked or bent can do the job. For smartphones and tablets, hammering can break the internal memory chips – just be sure to remove the battery first to avoid accidents, and concentrate force on the circuit board where the storage chip resides (not just cracking the screen).
- Degaussing (magnetic erasure): This only works for magnetic media like older HDDs or backup tapes. A degausser is a powerful electromagnet that disrupts the magnetic field on the disk platters, essentially scrambling all the bits. After a proper degaussing, the drive’s data is gone (and usually the drive is unusable afterward). Degaussing doesn’t apply to SSDs or flash memory (they aren’t magnetic).
- Incineration: Burning a device in a high-temperature incinerator will destroy it (and its data) completely. Obviously, this is not practical at home and is hazardous – it should be done by specialized facilities to handle the toxic fumes/materials safely. Incineration is typically reserved for bulk destruction by certified providers.
Safety first: If you decide to DIY destroy a device, take precautions. Wear eye protection and gloves. Be mindful of sharp shards from drives or glass. As mentioned, remove batteries from phones or laptops before attacking them (lithium batteries can explode or release dangerous chemicals if punctured). Work in a safe area (outdoors or a well-ventilated space) and use appropriate tools. It may be wise to drill on a sturdy surface like a concrete floor or thick wooden block to avoid injury or property damage. If you’re not comfortable doing this, it’s perfectly okay to leave it to professionals.
Verify destruction and recycle: If using a professional service, ensure they provide proof (like a destruction certificate and maybe even serial numbers of devices destroyed). After destruction, remember that the remains are electronic waste. Recycle the debris responsibly – many e-waste recyclers will accept shattered drives or devices for proper material recovery. Don’t just toss pulverized electronics in the trash; they still contain metals and potentially hazardous substances that should be kept out of landfills.
Use physical destruction selectively. For example, if you have an old hard drive that stored years of financial records and you don’t need the drive anymore, destroying it might give you peace of mind. But if a good wipe will suffice and you’d like to resell the device, do that instead. Always weigh the device’s reuse value versus the sensitivity of its data.
Verifying the Data Is Gone (and Disposing of Hardware Safely)
Once you’ve wiped (or destroyed) your device, it’s worth taking a moment to verify that your data has indeed been erased – especially if you plan to pass the device on. We touched on verification steps in each section, but here’s a recap:
- Scan for Recoverable Data: Use a reputable data recovery software to scan the device’s storage after wiping. For computers, tools like Recuva, EaseUS Data Recovery, or PhotoRec can scan a drive and see if any files turn up. After a proper wipe, these tools should find either nothing at all or just random unnamed fragments that can’t be opened. On a phone, you might use a mobile recovery tool (connecting the phone to a computer with something like Dr.Fone, for instance). If the scan comes up empty, you can be confident the wipe was successful. If it still finds intact files, you may need to repeat a more thorough erase.
- Check Device Info: Sometimes simply checking the device’s storage usage or performing a factory reset verification can reassure you. For example, after resetting a phone, look at the storage in settings – it should show very low usage (just the OS) and no personal data. Or on a PC, you might boot it up and see that your old user account is gone and only a fresh OS setup is present.
- Professional Certificates: If this is in a business context or you’re extremely cautious, you can seek out a professional data destruction service that provides a certificate of data erasure/destruction. Tools like Blancco or BitRaser automatically generate reports when they wipe a drive, indicating the drive’s serial number and that it was wiped to certain standards. These can be kept as proof for auditors or just your own records.
After verification, your focus should shift to disposing of or repurposing the device hardware in an environmentally friendly way:
- Recycle or Trade In: The best option for dead or unwanted devices is to send them to an electronics recycling facility. Many cities have e-waste drop-off programs, and retailers like Best Buy or Staples offer electronics recycling. There are also mail-in programs and manufacturer take-back initiatives (for example, Apple’s recycling program or smartphone trade-in offers from carriers). Proper recycling ensures that metals and components are reclaimed and toxic materials are handled safely. It’s far better than tossing devices in the trash, which can harm the environment.
- Donate or Sell (if still usable): If the device is still in working condition and fairly recent, consider donating it or selling it after wiping. Schools, charities, or family members might benefit from an old laptop or phone. Just make sure all your data is wiped (as we’ve done) and that you also remove any stickers or personal info on the physical device. Factory-reset devices are generally fine to give away – the new user will set them up from scratch.
- Retain proof of wipe/destruction: It may be overkill for personal devices, but for businesses or anyone who likes documentation, note down the date and method of wipe/destruction for each device you dispose of. Some people even take a photo of a destroyed drive or keep the wipe log file. This can help if there’s ever a question later like “Did we properly wipe that old server drive?” You’ll have evidence that you did.
At this point, you should have the peace of mind that your old device carries no trace of your personal data. You can hand it off or recycle it without worrying about a stranger digging through your files.
Conclusion
Permanently erasing data from old devices might seem daunting, but with the right steps it’s quite achievable – and absolutely worth it for the security it provides. In this 2025 guide, we covered how simply deleting files or doing a basic reset isn’t enough to protect your privacy. By using proper tools to overwrite data or leveraging strong encryption and factory resets, you can ensure that your personal information is gone for good. Whether it’s a computer, a smartphone, or even a USB stick, taking the time to securely wipe or destroy the data means you won’t lie awake worrying who might stumble upon your old tax returns or photos on a discarded device.
In today’s world, data is an extremely valuable asset – and that includes the data stored on devices you’re no longer using. Treat it with care. Before you toss out or sell any gadget, make data erasure a standard part of your checklist. The techniques discussed (from software wipes to physical destruction) cover a range of needs. Most users will find that the built-in encryption and reset functions in modern devices do an excellent job when used properly. For older gear, tools like DBAN or third-party apps fill the gap. And for the most sensitive situations, you have the option of the hammer or shredder approach.
By permanently erasing your data, you’re not only protecting yourself from identity theft and leaks – you’re also enabling yourself to recycle electronics responsibly without fear. You can donate that old laptop or trade in that phone with confidence that it’s been scrubbed clean. It’s a satisfying feeling to know you’ve closed a door securely.
Finally, as you continue to improve your personal cybersecurity habits, feel free to explore related resources on staying safe in the digital world. For example, you might read our guide on How to Protect Your Privacy on Social Media in 2025 to ensure you’re not oversharing online, or check out How to Secure Your Home Wi-Fi Network in 2025 for tips on locking down your home internet. Taking a holistic approach – from retiring devices securely to practicing safe browsing and networking – will keep your data and privacy safe in the long run.
In summary: Before you part with any old device, always wipe it thoroughly (or destroy it if needed). The steps might take an extra hour of effort, but the protection it gives you can last a lifetime. Your future self will thank you for not leaving a digital treasure trove for the next owner. Stay safe, and happy recycling!
Sources
- https://www.techradar.com/news/millions-of-deleted-files-recovered-in-hard-drives-purchased-online-finds-research
- https://www.hostingadvice.com/studies/forgotten-files-survey/
- https://ecircular.com/guide-to-erasing-data-from-old-electronics/
- https://www.russharvey.bc.ca/resources/pcdisposal.html
- https://support.google.com/android/answer/6088915 (Android Factory Reset instructions)
- https://toolbox.easeus.com/hdd-wipe/make-ssd-data-unrecoverable.html
- https://www.securedatarecovery.com/blog/destroy-old-cell-phones
- https://www.webroot.com/us/en/resources/tips-articles/how-to-wipe-your-device-before-donating
- https://www.ciodive.com/news/data-erased-from-corporate-drives-may-still-fall-into-wrong-hands-study/421743/
- https://nexgyn.io/how-to-protect-your-privacy-on-social-media-in-2025/